
A DIY adjustable solar panel stand gives you a way to position portable solar panels toward the sun without installing them permanently on a roof. A stand made with a wooden frame, adjustable supports, and locking wheels may be useful for small off-grid projects, temporary outdoor setups, or a backyard solar charging station.
However, a solar stand must do more than hold a panel at the right angle. It needs to support the panel’s weight, resist tipping, protect the module frame, and remain stable when wind conditions change. The wheeled wooden design shown in many online projects is a useful starting concept, not a tested construction plan.
DIY Solar Panel Stand: Quick Overview
- Design: Freestanding adjustable solar panel support.
- Frame material: Suitable treated wood or engineered metal.
- Adjustment: Hinged panel support with secured angle positions.
- Mobility: Lockable caster wheels, when suitable for the ground surface.
- Possible uses: Portable solar setups, garden workshops, and temporary off-grid charging.
- Critical requirements: Structural strength, approved panel clamps, wind resistance, and cable protection.
- Limitations: A homemade wheeled stand is not automatically suitable for permanent outdoor exposure.
Bottom line: Build around the actual solar panel specifications and a verified support design. Do not copy frame dimensions or hardware sizes from a picture without checking them.
What Is an Adjustable Solar Panel Stand?
An adjustable solar panel stand is a support structure that holds photovoltaic modules at a chosen angle above the ground. Unlike a fixed roof mount, a portable stand may be moved or repositioned to suit a changing outdoor setup.
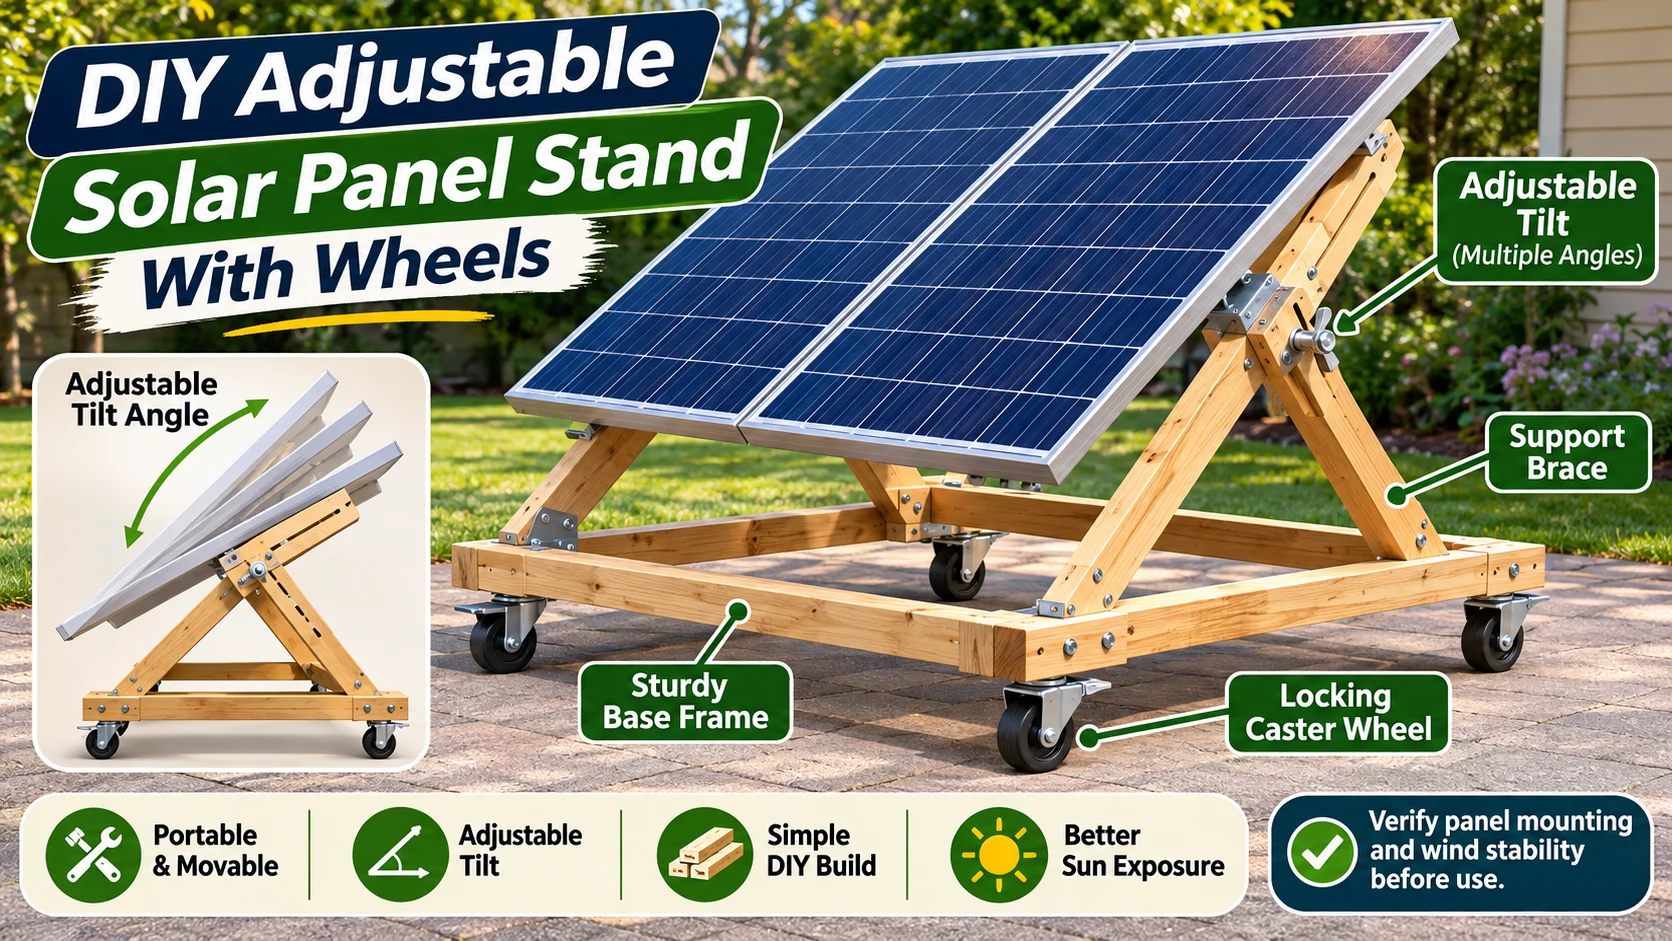
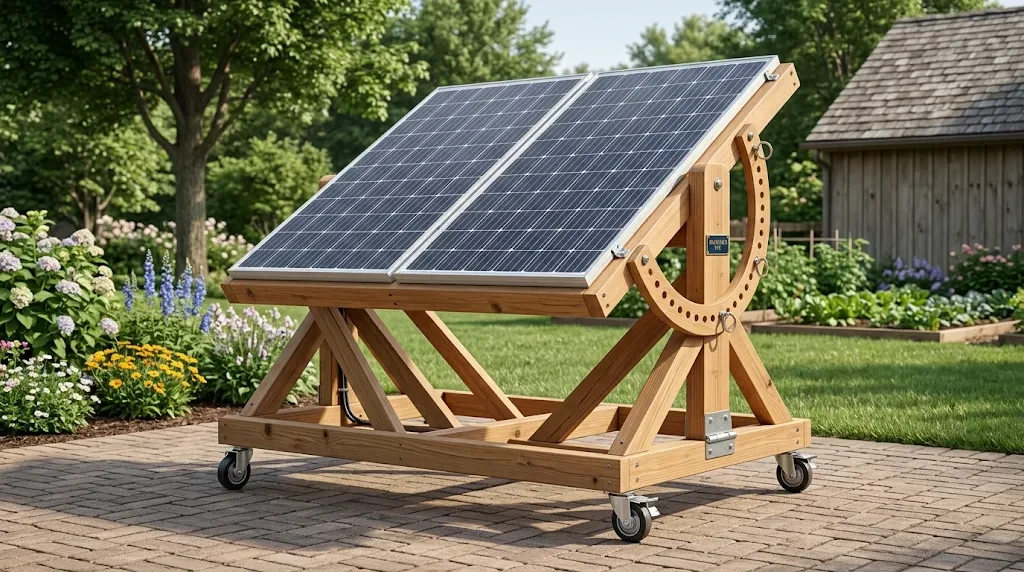
Some stands use folding legs. Others use triangular braces, sliding supports, or adjustable hinges. The concept in the reference image uses a rectangular wooden base, hinged upper frame, diagonal supports, and caster wheels.
The purpose is simple: hold the solar panel securely while allowing its tilt or orientation to be changed when the stand is safely positioned.
Parts of a Portable Wooden Solar Panel Stand
The following components are commonly found in adjustable wooden solar stands. The final material sizes and hardware ratings must be selected for the actual panel and design.
| Component | Purpose |
|---|---|
| Base frame | Supports the structure and helps resist tipping |
| Upper panel support | Holds approved module mounting hardware |
| Hinges | Allow controlled angle adjustment |
| Diagonal braces | Support the tilted upper frame |
| Locking adjustment hardware | Secures the selected tilt position |
| Caster wheels | Allow repositioning when the system is safe to move |
| Cross braces | Help prevent frame twisting or racking |
| Approved solar clamps | Attach modules at manufacturer-permitted locations |
| Weather-resistant finish | Helps protect suitable wood components outdoors |
Why the Base Frame Matters
The base supports the panel, upper frame, and adjustment mechanism. A wider and properly engineered base may improve resistance to tipping, but base dimensions alone do not establish wind safety.
The panel acts like a broad surface exposed to wind. As its tilt changes, so do the direction and magnitude of the forces acting on the stand.
Thin wood, weak joints, or poorly connected wheels can fail even when the solar module itself is relatively light.
Why Adjustable Braces Matter
The angled supports hold the upper frame in its selected position. A design needs a reliable way to prevent the frame from collapsing or changing angle unexpectedly.
A wing nut by itself should not be assumed to provide sufficient locking strength. A properly designed mechanism may require positive mechanical stops, locking pins, rated joints, or another verified restraint system.
Before Building: Measure Your Solar Panels
The biggest mistake in copying a DIY stand is choosing the wooden frame dimensions before identifying the solar panels.
Two panels with the same rated power may have different lengths, widths, frame thicknesses, weights, and permitted mounting locations.
Check the module’s documentation for these details:
- Overall panel length and width.
- Module weight and frame construction.
- Approved clamping or mounting zones.
- Permitted panel orientation.
- Mechanical load limitations.
- Required mounting clearances.
- Grounding and bonding requirements.
- Connector and cable-management instructions.
A wooden stand should hold suitable mounting rails or approved clamps without bending or damaging the panel frame.
Mounting warning: Do not drill new holes into a solar panel frame or fasten screws through the panel backsheet. Many manufacturers require specific approved attachment points and mounting hardware. Unauthorized modifications can damage the module and affect its warranty or safety certification.
DIY Solar Panel Stand Dimensions: What About the Pinterest Measurements?
The reference image presents an example wooden base about 1,200 mm long and 900 mm wide, along with shorter support pieces. Those numbers describe the illustrated concept, not a universal cutting plan.
The correct frame size depends on the solar panel dimensions, the number of modules, the required mounting points, and the stand’s stability.
| Pinterest Detail | What to Verify |
|---|---|
| 1,200 mm base length | Panel dimensions and stability assessment |
| 900 mm base width | Support geometry and tipping resistance |
| Wooden support legs | Member strength and joint design |
| Four caster wheels | Load rating, ground suitability, and restraints |
| 15°–60° adjustment | Bracing and locking at each proposed angle |
| Two solar modules | Combined dimensions, weight, and approved clamps |
For a precise construction drawing, the panel model and site conditions must be known. Without those details, publishing exact cutting dimensions would create unnecessary risk.
How to Plan a DIY Adjustable Solar Panel Stand
The following steps describe a safe planning workflow for a portable solar stand. They are not an engineering-certified set of assembly instructions.
- Identify the solar module. Record its dimensions, weight, mounting zones, and applicable mechanical requirements.
- Select a suitable frame design. Decide whether a wood or metal structure is appropriate for the panel size and operating environment.
- Plan the base footprint. Evaluate stability on the actual ground surface, including changes in center of gravity as the tilt increases.
- Design the hinge arrangement. Use suitable mechanical hardware that can handle the forces from the supported panel.
- Plan positive tilt locking. Provide secure positions that do not depend only on friction from loosely tightened hardware.
- Assess mobility. Choose wheels and restraints appropriate for the total weight and surface. Do not use caster brakes as the sole wind restraint.
- Specify approved module attachments. Use mounting hardware compatible with the panel manufacturer’s requirements.
- Plan cable management. Protect conductors from pinching, dragging, abrasion, and excessive strain while the stand moves.
- Verify structural safety. Check wind, accidental loading, joint strength, and stability before using the structure.
- Test the finished support. Have the design inspected before mounting an expensive or heavy solar module.
A small practice prototype without a solar module can help you visualize the hinge and brace movements. However, successful movement of an unloaded frame does not prove it is safe under panel weight or wind pressure.
How to Choose the Best Solar Panel Tilt Angle
The tilt angle is measured between the solar panel surface and the horizontal ground. A flat panel has a tilt of 0°, while a vertical panel has a tilt of 90°.
The best angle depends on latitude, season, local weather, shading, and whether your goal is maximum annual energy or stronger production during a particular season.
In much of the Northern Hemisphere, a south-facing panel can provide strong annual solar exposure when other factors are comparable. In the Southern Hemisphere, north-facing orientations are often favorable.
Typical Tilt Considerations
| Tilt | General Consideration |
|---|---|
| 15° | Lower tilt may suit some summer or low-latitude conditions |
| 30° | Moderate tilt often used in fixed-array planning examples |
| 45° | Steeper angle may favor lower winter sun in some locations |
| 60° | Steep positioning requires careful stability and wind assessment |
According to the National Renewable Energy Laboratory’s PVWatts system-design guidance, tilt and orientation affect energy production, and the best configuration varies by location and project goals.
To estimate the effect of changing tilt, use NREL’s PVWatts Calculator with local solar data and the proposed array specifications.
Can an Adjustable Stand Improve Solar Panel Output?
Changing the panel tilt or direction can improve its exposure to sunlight at certain times. But the improvement is not the same everywhere.
A panel tilted toward the sun may collect more direct sunlight than one facing away from it. However, moving a portable stand also introduces handling risks, cable strain, and time spent repositioning the equipment.
Manually rotating a stand is not the same as a motorized solar tracking system. A stand on four wheels does not automatically follow the sun.
For most small systems, a stable position with good sunlight and little shade is more valuable than an elaborate adjustment mechanism that cannot be operated safely.
Are Wheels a Good Idea for a Solar Panel Stand?
Wheels can make a portable stand easier to move across a smooth, level surface. They may be useful in a workshop yard or another controlled setting.
However, a wheeled solar frame is not automatically secure when parked. Even lockable casters may slide, rotate, sink into soft ground, or fail to resist tipping.
What to Check Before Using Casters
- Load rating of each wheel and mounting plate.
- Total weight of the panel and stand.
- Uneven weight distribution at different tilt angles.
- Grass, gravel, concrete, or other surface conditions.
- Risk of movement on slopes.
- Need for independent restraints or a protected storage position.
- Whether the manufacturer permits the proposed mobile support arrangement.
Wind safety: A tilted solar panel can act like a sail. Caster locks and loose ballast are not substitutes for a properly designed anchoring or restraint system. Remove or secure portable equipment according to its approved weather limits, and never attempt to reposition a large panel in windy conditions.
Wood vs. Aluminum Solar Panel Stands
Wood is easy to cut and assemble with common workshop tools. Aluminum is often used in commercial solar racking because of its weight, corrosion resistance, and compatibility with engineered mounting systems.
| Feature | Wood | Aluminum |
|---|---|---|
| Fabrication | Accessible with common woodworking tools | May need specialized fittings |
| Outdoor exposure | Requires suitable protection and inspection | Corrosion-resistant with proper design |
| Structural behavior | Depends on wood grade, moisture, and joints | Depends on profile, alloy, and connections |
| Adjustability | Possible with suitable hinges and braces | Possible with engineered hardware |
| Module mounting | Needs approved mounting interface | Commercial racking options may be available |
| Long-term use | Requires frequent condition checks | Still requires periodic inspection |
Neither material is safe solely because it is strong or heavy. The connections, geometry, loads, and complete assembly determine structural performance.
How Much Does a DIY Solar Panel Stand Cost?
The reference image suggests a low budget for wood, wheels, and basic hardware. However, that estimate cannot be treated as a reliable US project cost.
A real budget may need to cover:
- Suitable structural lumber or metal profiles.
- Weather-resistant fasteners and brackets.
- Hinges, positive locking mechanisms, and support braces.
- Approved solar panel mounting rails and clamps.
- Wheels, restraints, or alternative base supports.
- Weatherproof wood finish, if applicable.
- Cable support and strain-relief equipment.
- Tools, testing, replacement parts, and professional review.
The cost also depends on panel size, the stand’s expected lifespan, exposure to wind, and whether the frame will be stored indoors between uses.
If you need a permanently installed ground-mounted system, compare engineered commercial racking with homemade construction rather than assuming the lowest materials price offers the best value.
Electrical Safety for a Movable Solar Panel
Even a portable solar panel produces electricity when exposed to light. Electrical cables and connectors must be suitable for the module voltage, current, environment, and connected equipment.
A moving stand creates additional risks because conductors can be pulled, pinched by hinges, caught under wheels, or damaged by repeated movement.
- Use approved connectors: Follow the module and equipment manufacturers’ compatibility instructions.
- Protect cable routes: Keep wiring clear of hinges, wheels, sharp edges, and standing water.
- Prevent strain: Movement should not pull directly on electrical connectors.
- Check the complete system: Any charge controller, battery, inverter, and protection equipment must be correctly rated.
- Avoid live disconnections: PV connectors must not be separated under load unless specifically designed and approved for that operation.
- Follow grounding requirements: Bonding and electrical protection depend on the module and system configuration.
Do not move a connected installation without following its approved shutdown and handling procedures. Have uncertain electrical arrangements checked by a qualified solar technician.
Common Mistakes When Building an Adjustable Solar Stand
- Copying dimensions from a photo: The frame may not fit or support the selected modules.
- Using ordinary screws as panel clamps: Solar modules require compatible approved attachment hardware.
- Relying on caster brakes: Wheels do not guarantee wind resistance or tipping stability.
- Using friction-only tilt locking: Loose joints can allow an unexpected collapse.
- Ignoring the panel’s weight distribution: The center of gravity changes with tilt.
- Using untreated or damaged wood: Outdoor exposure can reduce joint and member reliability.
- Leaving cables near hinges: Movement can damage electrical insulation and connectors.
- Changing angles in strong wind: Large panels may be difficult to control safely.
- Assuming 360-degree mobility means solar tracking: Manual repositioning is not automated sun tracking.
- Ignoring manufacturer instructions: An unsuitable mounting method can damage the solar module.
Frequently Asked Questions
Can I build a solar panel stand from wood?
Wood can be used for some small solar support structures when the complete design is suitable for the panel, environmental loads, and mounting requirements. It should not be assumed safe without checking the joints, frame strength, and manufacturer instructions.
What is the best angle for a portable solar panel?
The best angle depends on your location, season, and energy goals. Tools such as PVWatts can help compare tilt settings using local solar resource data.
Can I put wheels under a solar panel stand?
Yes, if the design accounts for wheel capacity, uneven surfaces, movement restraints, and tipping forces. Locking casters alone are not enough to confirm outdoor wind safety.
Is a 15° to 60° adjustable stand practical?
It can be, but every intended position needs adequate support and locking. A steeper tilt changes the stand’s geometry and wind exposure, so the entire range must be verified.
Can a solar panel stand rotate 360 degrees?
A portable wheeled stand can sometimes be turned manually, but a full rotation requires enough clear space and protected wiring. It does not mean the stand tracks the sun automatically.
How do I attach a solar panel to a wooden frame?
Use an engineered mounting interface with approved panel clamps or manufacturer-permitted attachment points. Never assume that drilling or screwing directly into the module frame is acceptable.
Is a DIY wooden stand suitable for a permanent solar installation?
Not automatically. Permanent installations require appropriate structural, electrical, weather, and code compliance. Engineered ground-mount racking may be a more practical option for long-term use.
Final DIY Solar Panel Stand Checklist
- Identify the exact panel model and weight.
- Confirm approved mounting locations.
- Choose a suitable wood or metal support structure.
- Evaluate frame strength and joint connections.
- Check stability at every proposed tilt position.
- Use positive locking and appropriate bracing.
- Assess wheel ratings and independent restraints.
- Plan for wind and weather exposure.
- Keep electrical cables away from moving parts.
- Verify electrical compatibility and protection.
- Inspect wood, hinges, clamps, and fasteners regularly.
- Use a professionally reviewed design for larger or permanently exposed arrays.
Is a DIY Adjustable Solar Panel Stand Worth Building?
A movable solar stand can be useful when you want flexibility without permanently attaching panels to a building. The ability to choose an orientation and tilt may improve sunlight exposure for certain portable setups.
But a wooden stand with hinges and wheels should never be judged only by how inexpensive or easy it looks to build. A safe structure must support the specific module, resist expected forces, and protect the panel and its electrical connections.
Start with the panel manufacturer’s documentation and a suitable structural design. Treat the online project as inspiration, not as a certified cutting plan or a guarantee of stability.
check Same Article solar
Technical sources: Canadian Solar: Module Installation Requirements, NREL/NLR: PVWatts System Design, DOE Building America: Solar Orientation, and US EIA: Solar Tilt and Orientation. Follow the latest manufacturer documentation for the exact module and mounting system.