
How to Build a High-Efficiency DIY Solar Tube for Your Home
Discover how a simple daylighting system can bring natural sunlight into dark rooms using a rooftop dome, reflective tubing, and a ceiling diffuser.
Dark hallways, bathrooms, closets, and interior rooms often need artificial lighting even during sunny days. But what if you could bring natural sunlight into these spaces without installing a traditional skylight?
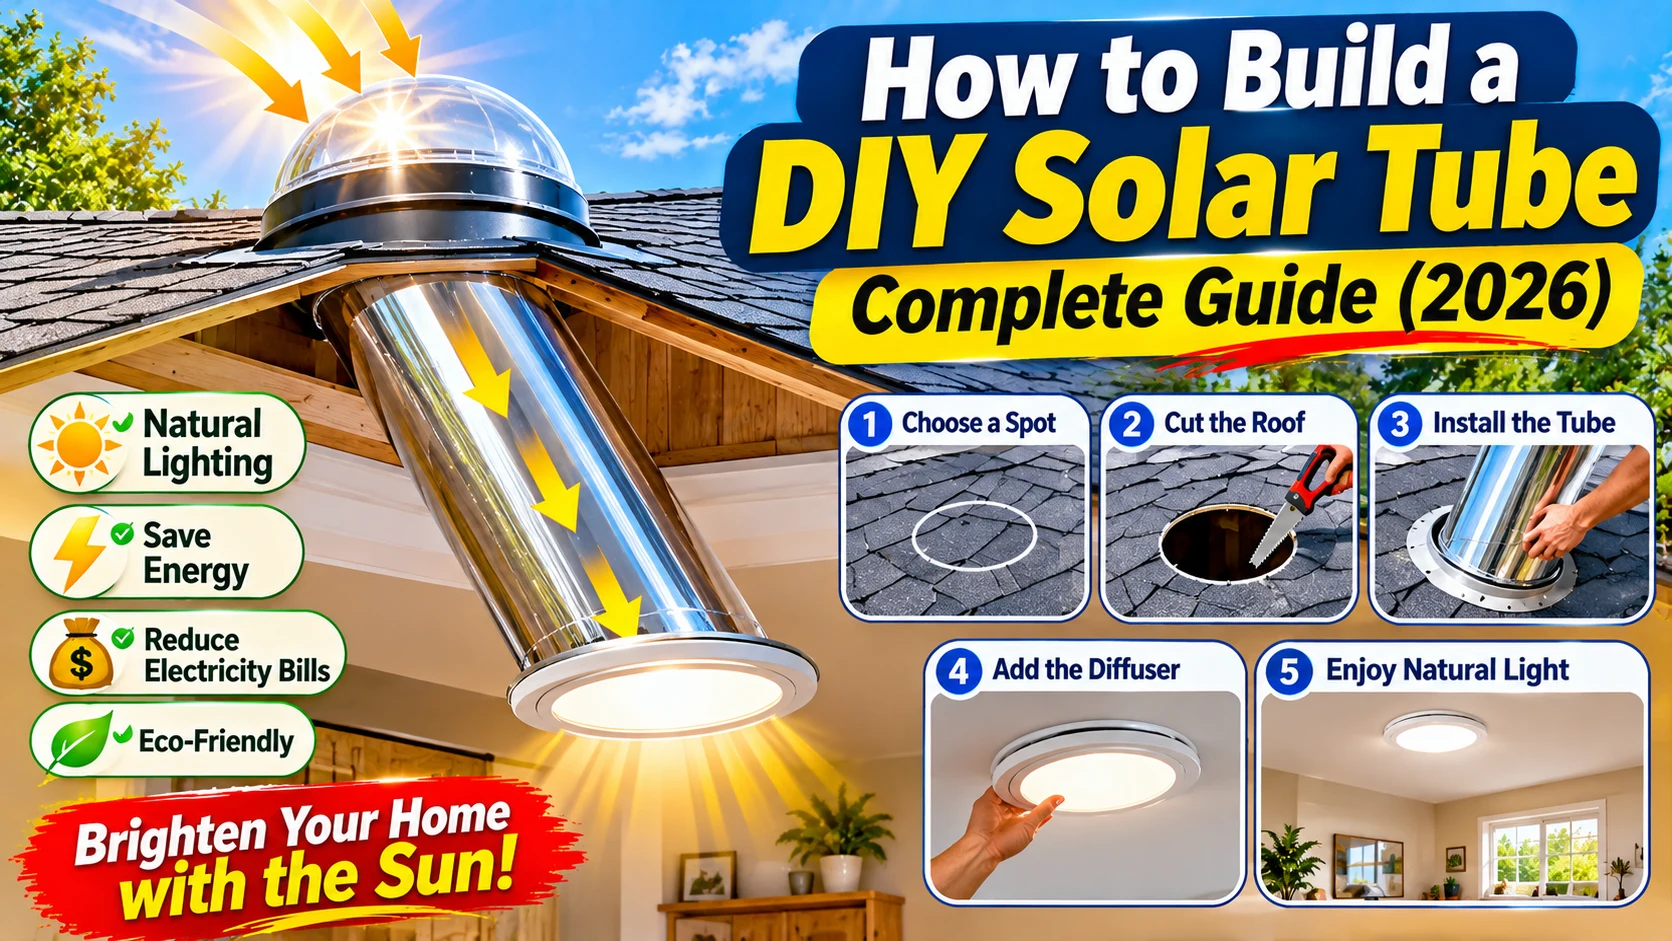
A DIY solar tube, also known as a sun tunnel or tubular skylight, offers an interesting solution. It captures daylight through a transparent dome installed on the roof and guides it through a highly reflective tube into the interior of a building.
Unlike conventional solar panels, a solar tube does not generate electricity. Instead, it uses natural sunlight to illuminate indoor spaces, potentially reducing the need to switch on electric lights during daylight hours.

With the right materials and careful planning, homeowners can understand how these systems work and explore whether a DIY installation is suitable for their property.
1. What Is a Solar Tube?
A solar tube is a daylighting device designed to transport natural sunlight from the roof into an interior room.
It generally consists of three main components:
- Roof collector: A transparent dome or roof-mounted collector captures incoming daylight.
- Reflective tube: A specially designed reflective surface directs sunlight through the roof and ceiling space.
- Ceiling diffuser: A translucent lens spreads the light into the room.
Some systems use rigid reflective tubing, while others use flexible reflective ducts. Rigid tubing is generally preferable for high-efficiency installations because it can reduce light losses associated with bends and surface irregularities.
How Is a Solar Tube Different From a Solar Panel?
The word solar can describe different technologies. A solar tube and a photovoltaic solar panel have very different purposes.
| Feature | Solar Tube | Solar Panel |
|---|---|---|
| Main Purpose | Indoor natural lighting | Electricity generation |
| Energy Source | Sunlight | Sunlight |
| Main Technology | Reflective light transmission | Photovoltaic cells |
| Electricity Produced | No | Yes |
| Typical Application | Hallways, bathrooms, closets | Homes, businesses, appliances |
2. How Does a DIY Solar Tube Work?
The operating principle is relatively simple. Sunlight enters the collector mounted on the roof and travels down a reflective tube toward the ceiling diffuser.
The inside of the tube is designed to reflect light efficiently, allowing daylight to travel through the building without requiring a large conventional skylight opening.
The Main Stages
The rooftop dome captures available daylight.
The reflective tube directs sunlight toward the room.
The ceiling diffuser spreads daylight indoors.
The room receives natural illumination during daylight hours.
Because the system relies on sunlight, the amount of light delivered changes throughout the day and across different weather conditions.
3. Materials Needed to Build a DIY Solar Tube
Before starting a project, it is important to understand the materials required. A daylighting tube needs components that can withstand outdoor conditions while maintaining good optical performance.
1. Transparent Roof Dome
The dome is the exterior collector that allows sunlight to enter the system.
Suitable commercial daylighting domes are typically manufactured from UV-resistant materials designed for outdoor exposure. Choose a component specifically intended for rooftop installation rather than an ordinary plastic cover.
2. Reflective Tube
The reflective tube transports light from the roof to the ceiling. Its interior surface should have high reflectance and be suitable for the intended application.
Purpose-built reflective daylighting tubing is preferable to ordinary ventilation ducting or homemade shiny foil because it is designed to maintain optical performance.
3. Roof Flashing
Flashing forms the weather-resistant connection between the roof and the collector assembly.
It must be compatible with the roofing material, roof pitch, and the specific daylighting product.
4. Ceiling Diffuser
The diffuser is installed at the interior ceiling opening. It helps distribute light more evenly and provides a finished appearance.
5. Insulation and Sealing Materials
Appropriate insulation and compatible sealing materials help prevent unwanted heat transfer, air leakage, and moisture problems.
Use products recommended by the system manufacturer and suitable for the surrounding construction materials.
6. Mounting and Support Components
Some installations require brackets, supports, adapters, or extension sections to connect the collector and diffuser correctly.
4. Choosing the Right Solar Tube Design
Not every building has the same roof structure or ceiling arrangement. The best solar tube design depends on the distance between the roof and the room, the roof type, and the available installation space.
Rigid Solar Tubes
Rigid tubes use straight reflective sections to transport daylight. They are often preferred where a relatively direct path can be created between the roof and ceiling.
Advantages include:
- Efficient light transmission in suitable installations.
- A relatively smooth reflective interior.
- Less dependence on complicated bends.
- Good performance when correctly installed.
Flexible Solar Tubes
Flexible systems can help when obstacles exist between the roof and ceiling. However, bends, stretching, and surface irregularities can reduce the amount of daylight reaching the diffuser.
Choosing the Tube Diameter
Solar tubes are available in different diameters. Larger systems can collect and transport more light, depending on the collector design and installation conditions.
The correct diameter depends on:
- Room size and intended brightness.
- Available roof area.
- Tube length.
- Number and sharpness of bends.
- Roof and ceiling construction.
- Manufacturer performance specifications.
Use the manufacturer’s sizing recommendations rather than choosing a diameter based only on appearance.
5. Step-by-Step Guide to Planning a DIY Solar Tube
A rooftop daylighting installation involves cutting through the building envelope. This can affect structural elements, waterproofing, insulation, and fire protection.
The following steps explain the planning and installation sequence. Actual roof cutting, structural modifications, and weatherproofing should be completed or supervised by qualified professionals.
Step 1: Select the Room
Choose an interior space that needs additional natural light. Common locations include:
- Dark hallways.
- Interior bathrooms.
- Closets and storage rooms.
- Small kitchens.
- Rooms with limited window access.
Consider the room’s size, ceiling height, existing windows, and the amount of daylight available from the roof.
Step 2: Inspect the Roof and Ceiling Space
Check the roof construction, ceiling arrangement, insulation, electrical wiring, plumbing, ventilation ducts, and structural members.
The planned tube route must avoid damaging roof supports, electrical cables, plumbing, and other building services.
Do not cut rafters, trusses, or other structural elements without an approved structural design.
Step 3: Choose a Suitable Collector Location
The collector should receive good exposure to natural daylight while avoiding unnecessary shading from trees, chimneys, nearby buildings, or rooftop equipment.
Roof orientation matters, but actual sunlight availability also depends on latitude, season, roof pitch, and local surroundings.
Step 4: Select a Compatible Daylighting Kit
Choose a system designed for the roof type and the required tube length.
Check the product specifications for:
- Collector dimensions.
- Tube diameter and extension options.
- Reflective performance.
- Approved roof pitches.
- Flashing compatibility.
- Insulation and sealing requirements.
- Installation instructions and warranty.
Step 5: Plan the Tube Route
Plan the shortest practical route between the roof collector and ceiling diffuser.
Try to minimize sharp bends and unnecessary extensions. A direct route generally helps preserve more incoming daylight.
Step 6: Prepare the Ceiling Opening
The diffuser must be positioned where it can distribute light effectively throughout the room.
Before creating an opening, verify that the location is free from hidden wiring, plumbing, structural obstructions, and other hazards.
Step 7: Install the Rooftop Collector and Flashing
The roof assembly must be installed according to the manufacturer’s instructions and the roofing system requirements.
Proper flashing, drainage, and weatherproofing are essential. A poorly sealed roof opening can cause leaks, moisture damage, and expensive repairs.
Step 8: Connect the Reflective Tube
Connect the reflective tube sections using the approved joining system. Maintain alignment and avoid unnecessary bends or damage to the reflective surface.
Step 9: Install the Ceiling Diffuser
Fit the diffuser and ceiling trim according to the product instructions. Ensure that the interior finish is secure and properly aligned.
Step 10: Inspect and Test the Installation
Check the installation for correct assembly, weatherproofing, insulation continuity, air leakage, and safe clearance from electrical and structural components.
After installation, observe the light output under different daylight conditions.
6. How to Improve Solar Tube Efficiency
The efficiency of a solar tube depends on how much daylight it collects and how much reaches the room.
Several design choices can improve the results.
Use High-Reflectance Tubing
The reflective interior is one of the most important parts of the system. A suitable reflective surface helps transport daylight with fewer losses.
Keep the Tube as Straight as Practical
Every bend can reduce light transmission. Where possible, choose a route with fewer turns and shorter tubing.
Reduce External Shading
Trees, nearby buildings, chimneys, and other rooftop equipment can block sunlight.
Choose a location with good daylight exposure throughout the year.
Use a Suitable Diffuser
A quality diffuser helps distribute light into the room. The correct design can improve visual comfort and reduce concentrated bright spots.
Maintain the Collector
Dust, leaves, and other debris can reduce the amount of light entering the dome.
Inspect the exterior collector periodically and clean it according to the manufacturer’s recommendations.
7. Best Places to Install a Solar Tube
Solar tubes are particularly useful in rooms where conventional windows cannot provide enough natural light.
Bring daylight into long interior corridors that receive little sunlight.
Improve natural illumination where conventional windows are limited.
Add daylight to selected kitchen areas, depending on the layout.
Make small storage areas brighter during daylight hours.
Introduce additional natural light into suitable workspaces.
Provide daylight where exterior walls and windows are unavailable.
8. Advantages of a DIY Solar Tube
Natural Daylight
A solar tube can bring daylight into interior spaces that might otherwise depend on artificial lighting.
Potential Electricity Savings
By reducing the need for electric lighting during bright daytime hours, a well-designed system may help reduce lighting electricity consumption.
Actual savings depend on how often lights would otherwise be used, the room’s daylight requirements, and local electricity prices.
Smaller Roof Opening Than Many Traditional Skylights
Many tubular daylighting systems use a relatively compact roof collector compared with a large conventional skylight. This can make them useful for certain roof layouts.
Improved Indoor Appearance
Natural light can make a room feel more open and welcoming. A suitable diffuser helps spread daylight across the interior.
No Electrical Generation Equipment Required
Unlike photovoltaic systems, solar tubes do not require solar inverters, batteries, or electrical connections to transport daylight.
9. Disadvantages and Limitations
Although solar tubes offer useful benefits, they are not suitable for every building or lighting requirement.
Dependence on Daylight
Light output changes with cloud cover, time of day, season, and weather conditions. A solar tube cannot provide consistent illumination at night.
Installation Can Be Complex
Roof access, structural obstacles, waterproofing, and ceiling construction can make installation more complicated than expected.
Limited Control Over Brightness
Some systems offer accessories to control or diffuse incoming light, but the amount of daylight still depends on outdoor conditions.
Potential Heat Transfer
Any opening through the roof can affect the thermal performance of the building envelope. Appropriate insulation and air sealing are important.
Not a Replacement for All Lighting
Solar tubes are useful for daytime illumination but do not replace artificial lighting when it is dark or when outdoor daylight is insufficient.
10. DIY Solar Tube vs. Traditional Skylight
| Feature | Solar Tube | Skylight |
|---|---|---|
| Design | Compact light-transport tube | Larger glazed roof opening |
| Light Distribution | Through a ceiling diffuser | Directly through glazing |
| Room Suitability | Interior spaces and corridors | Rooms below the roof |
| View of Sky | Usually no direct view | Often provides a sky view |
| Roof Opening | Usually smaller | Often larger |
The better option depends on the building layout, desired appearance, room location, daylight requirements, and installation budget.
11. How Much Does a Solar Tube Cost?
The total cost of a solar tube installation varies according to the product, tube diameter, roof type, installation complexity, and local labor prices.
A commercial daylighting kit may include the dome, reflective tube, flashing, ceiling diffuser, and required connectors. A more complicated installation may require additional extensions, adapters, insulation, and professional labor.
Main Cost Factors
- Collector and dome quality.
- Tube diameter and length.
- Reflective material performance.
- Roof type and pitch.
- Flashing and weatherproofing requirements.
- Ceiling and attic access.
- Professional installation costs.
For an accurate budget, compare complete kits with compatible components rather than purchasing separate materials without checking their specifications.
12. Important Safety Tips Before Installation
Working on a roof involves fall hazards, sharp materials, electrical services, and possible structural risks.
Keep these precautions in mind:
- Never work on a wet, icy, or unstable roof.
- Use appropriate fall protection and safe access equipment.
- Identify electrical wiring and plumbing before opening ceilings or roofs.
- Do not cut structural rafters or trusses without professional approval.
- Use roof flashing designed for the roofing material.
- Follow the manufacturer’s installation and sealing instructions.
- Maintain the building’s insulation and air-sealing requirements.
- Use qualified professionals for structural work and roof penetrations where required.
13. Is a DIY Solar Tube Worth It?
A solar tube can be a practical daylighting improvement when a room has limited access to natural light and the roof layout allows a suitable installation.
It may be especially useful in:
- Homes with dark interior hallways.
- Buildings with bathrooms below accessible roof areas.
- Small homes where traditional skylights are difficult to install.
- Rooms that need additional daytime illumination.
However, the project should be evaluated carefully. The cost of a professional installation, potential roof modifications, and the amount of daylight actually delivered should all be considered.
For many homeowners, a purpose-built solar tube kit offers a more predictable result than attempting to manufacture every component from general-purpose materials.
Final Thoughts
A DIY solar tube is an interesting way to bring natural daylight into rooms that receive little sunlight. By combining a rooftop collector, reflective tubing, and a ceiling diffuser, the system transports daylight into the home without generating electricity.
Its performance depends on good design, suitable materials, a direct tube route, and proper installation. Roof waterproofing, insulation, structural safety, and weather resistance are just as important as the reflective tube itself.
If you are planning a daylighting project, start by choosing the right room, inspecting the roof structure, and comparing purpose-built solar tube systems. A well-planned installation can make an interior space brighter while reducing the need for artificial lighting during suitable daylight hours.
Frequently Asked Questions
1. What is a DIY solar tube?
A DIY solar tube is a daylighting system that collects sunlight through a rooftop dome and directs it into an interior room using reflective tubing and a ceiling diffuser.
2. Does a solar tube generate electricity?
No. A solar tube transports natural daylight into a building. Photovoltaic solar panels are the technology used to generate electricity from sunlight.
3. Can I build a solar tube using aluminum foil?
Ordinary aluminum foil is not a reliable replacement for purpose-built reflective daylighting tubing. Its surface, seams, durability, and optical performance may lead to significant light losses.
4. Does a solar tube work on cloudy days?
Yes, it can still collect diffuse daylight under cloudy conditions, but the amount of light delivered is generally lower than under bright sunny conditions.
5. Can a solar tube light a bathroom?
Yes. Bathrooms are common applications for tubular daylighting systems. The product and installation must be suitable for the environment, including moisture and ventilation requirements.
6. Does a solar tube work at night?
No. A standard solar tube requires available daylight. Artificial lighting is still needed after sunset or when natural light is insufficient.
7. Are solar tubes better than skylights?
Neither option is always better. Solar tubes can be useful for interior rooms and compact roof openings, while skylights provide a direct view of the sky and can illuminate spaces directly beneath the roof.
8. Can I install a solar tube on any roof?
Not necessarily. Roof material, pitch, structural design, available space, and product compatibility determine whether a particular system can be installed safely.
Disclaimer: This article is for educational purposes only. Solar tube installations involve roof penetrations and potential structural and weatherproofing risks. Follow manufacturer instructions and local building requirements, and consult qualified professionals when necessary.